Post Fifth Pictures is a media production company with specialties in film…
Replacing Dual Mono Tracks with Stereo Tracks in Media Composer
I am working on a feature right now that I brought over from Premiere into Media Composer as it transitioned from one crew to another. Our lead editor requested that some tracks be converted from dual mono to stereo tracks. I know that some of us in the editorial community have looked for an automated way to do this conversion, but the dual mono clips, as two single files (not a true dual mono file), cannot be converted into a stereo track. Here is a tutorial I wrote out for the process. I hope it helps as many of you as it can and good luck! Please let me know if you have any tips to improve the process.
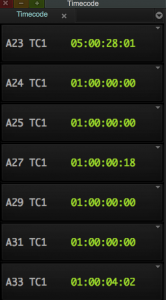
Setup your timecode tool in the Avid to have as many tracks that you will need in order to cover one of the dual mono audio tracks.
Move all your dual mono tracks that you want to convert into stereo tracks into a designated area on the timeline. In this example, they cover A22-A33.
If you have brought in new stereo tracks to replace the mono ones (if your audio was from an OMF or AAF, that will need to be the case as you cannot make stereo clips out of an L and R pair without doing a mixdown), bring those into the same bin as your dual mono SFX and before you sort them all together, color them all the same color so you know by sight which ones are stereo clips. I’m coloring mine light blue. I don’t have the dual mono colored at all for now. When that is done, sort the sound effects by name. You should see the Stereo sound effect, the L channel sound effect and a R channel sound effect in the bin now. They may be in a different order, but they should all be there.
Create some stereo tracks on the timeline. I only create one at a time so I don’t need to create more than necessary. The shortcut for this is Command + Shift + U. The track will go at wherever the last track left off. Like, if you have Track 1-10, 15-20 (because you deleted 5 tracks at one point), the new track will go to A11.
Only highlight one/two tracks at a time, basically whichever your SFX clip to replace is on. I’m starting at A33 and working my way up. I’ve set a keyboard shortcut for F2 – Match Frame, F4 – Find Bin and Tab to Toggle Source/Record. T is already set to Mark Clip as a default. Also, having audio waveforms on the timeline helps as a visual check to make sure they look like the same effect as you replace the files.
![]()
With A32 & A33 as the only tracks highlighted, I move the curser to the first frame of the clip I am going to replace. I hit T so it marks an in and out on the clip I want to replace. I see the first frame of the SFX clip is 1:00:04:02. I hit F2 (Match Frame) and F4 to Find the Bin where it is at. You can see in the image that there is a Stereo Clip (in light blue) and the L and R channel file for that sound effect. I load the stereo/blue clip in the source monitor (fancy way of saying double click).
Networking Tips: Maintaining and Tracking Your Network
Here are some things I use to keep track of my network. The tips I mention in this video are more personal and lead to more work than the “easy to use” contacting on LinkedIn, Facebook messaging or more impersonal methods that social media will have you believe work.
Create a document that has the following columns:
Name:
Position/Company:
Their Advice:
Last time contacted:
Songster: Organizing Your Editing Music Library
I’ve had the opportunity to use Songster for a couple years and…
Smart DX – Tracking Takes and Creating Markers Live
I’ve been working on a several animated projects in the past few years (Tron: Uprising, Kung Fu Panda 3, an upcoming feature produced by Paramount Pictures among others) and one thing that has always been difficult is the manual process of breaking down dialogue. I’ve learned to become very fast at it, but it’s still very time consuming and always seems to happen when there is already a crunch going on in editorial.
I’ve been trying to figure out how to streamline the process and I grabbed some friends and colleagues and have come up with this application called Smart DX. It helps you track takes while you are in the recording session and lets you change marker colors (circle takes vs. false starts vs. producer picks) as you go.
I’ve created a KickStarter page for the project. I’ll post some tutorials in the next coming weeks as to how this can be useful for one man band shops, small companies and bigger budget features. Take a look at the project and if you the project would help you, reserve your copy.
What’s Your Editing Weakness?
What is the hardest thing you come across in the realm of editing or in filmmaking?
Creating a “Flipbook” of a Project
I put out this request a couple of weeks ago and I think I have found a solution combining the use of a few different scripts.. I know that some editors in the animation area will be interested in this post and some other people may find it helpful as well. What this does is make an image sequence of your project, but ONLY with the first frame of each cut.
1. Start with an XML (FCP) or AAF (I found that an Avid AAF with a video mixdown imports the fastest, even if they come up all offline). You just need the cuts. If the media comes up offline, just grab a quicktime reference of the sequence you are using. I should mention that you should flatten your sequence as much as possible. I will explain why in #3.
2. Import via Automatic Duck to After Effects. CS6 will do the ProImport so you don’t have to download auto duck, but in previous versions you will have to get the free (now it is anyway) plug-in. Note that I tell it to ignore audio so those don’t come in as cuts either. That will interfere with how many shots get exported.
Wanted: After Effects Script
I have had a great time looking at aescripts.com and maybe with…
Splitting Audio Tracks for ADR and Composer
If you want to look like one rad editor for your composer, output a cut for them with all dialogue (DX) panned to the left and music (MX) and sound effects (SFX) panned to the right. This will show them you are a pro.
To do this in FCP, I would just change the pan on the tracks that contain DX to left and the MX and SFX to right. This is one reason it is so important to make sure your tracks are organized throughout your edit. Try to keep dialogue on tracks 1-5, SFX on 6-12 and music on 13-16 (or some variation of that).
In Avid, the easiest thing to do is make a mono audio mixdown of the tracks that contain DX and then another for MX/SFX. Then you only export the cut with those tracks and pan left and right respectively.