I am working on a feature right now that I brought over from Premiere into Media Composer as it transitioned from one crew to another. Our lead editor requested that some tracks be converted from dual mono to stereo tracks. I know that some of us in the editorial community have looked for an automated way to do this conversion, but the dual mono clips, as two single files (not a true dual mono file), cannot be converted into a stereo track. Here is a tutorial I wrote out for the process. I hope it helps as many of you as it can and good luck! Please let me know if you have any tips to improve the process.

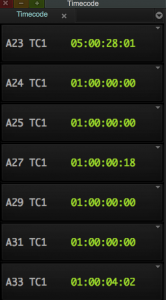
Setup your timecode tool in the Avid to have as many tracks that you will need in order to cover one of the dual mono audio tracks.
Move all your dual mono tracks that you want to convert into stereo tracks into a designated area on the timeline. In this example, they cover A22-A33.
If you have brought in new stereo tracks to replace the mono ones (if your audio was from an OMF or AAF, that will need to be the case as you cannot make stereo clips out of an L and R pair without doing a mixdown), bring those into the same bin as your dual mono SFX and before you sort them all together, color them all the same color so you know by sight which ones are stereo clips. I’m coloring mine light blue. I don’t have the dual mono colored at all for now. When that is done, sort the sound effects by name. You should see the Stereo sound effect, the L channel sound effect and a R channel sound effect in the bin now. They may be in a different order, but they should all be there.
Create some stereo tracks on the timeline. I only create one at a time so I don’t need to create more than necessary. The shortcut for this is Command + Shift + U. The track will go at wherever the last track left off. Like, if you have Track 1-10, 15-20 (because you deleted 5 tracks at one point), the new track will go to A11.
Only highlight one/two tracks at a time, basically whichever your SFX clip to replace is on. I’m starting at A33 and working my way up. I’ve set a keyboard shortcut for F2 – Match Frame, F4 – Find Bin and Tab to Toggle Source/Record. T is already set to Mark Clip as a default. Also, having audio waveforms on the timeline helps as a visual check to make sure they look like the same effect as you replace the files.
![]()
With A32 & A33 as the only tracks highlighted, I move the curser to the first frame of the clip I am going to replace. I hit T so it marks an in and out on the clip I want to replace. I see the first frame of the SFX clip is 1:00:04:02. I hit F2 (Match Frame) and F4 to Find the Bin where it is at. You can see in the image that there is a Stereo Clip (in light blue) and the L and R channel file for that sound effect. I load the stereo/blue clip in the source monitor (fancy way of saying double click).